
Managing Zendesk Orgs Through Google Sheets
Leverage the Zendesk API combined with Google Sheets to easily manage orgs
If you have a lot of organizations/customers in Zendesk it can be a daunting, manual task if you need to administer them.
Some typical use cases:
Adding New Orgs: You can use Zendesk’s built-in importer but it’s limited
Updating Existing Orgs: Maybe you want to add a tag, update a custom field, or apply a ‘bulk change’ to any other field on the organization page.
Let’s step through how you can achieve these two use cases using only Google Sheets and a script.
There are a few steps involved:
Generate an API key in Zendesk to allow access to Google Sheets
Create a Google Sheet and retrieve your organizations via the API
Make any updates in the Google Sheet
Push the changes back to Zendesk
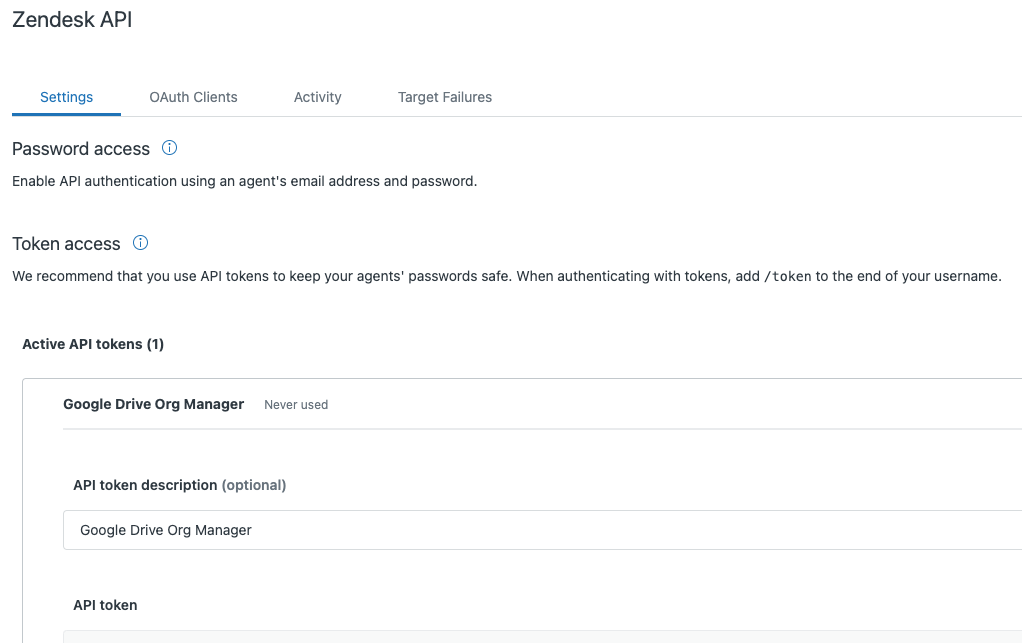
Generate API Key
You'll need an API key to allow you script access to your Zendesk instance. You can revoke it later if you like.
Open Zendesk Admin Center
Navigate to Apps & Integrations > Zendesk API
Click Add API Token
Give it a descriptive name so you or another admin recognises it in the future
Copy the key to your clipboard and save it somewhere securely like a password manager
Click Save. You'll need this key later.

Generate an API key in Zendesk to allow Google Sheets access your orgs
Create Google Sheet
I recommend retrieving the data from Zendesk via API. To do this, follow this post first Export Organizations To Google Sheets
Once you’re done, you should have a Google Sheet with all of your Zendesk organization data ready to be edited.
You can use the table below as a reference for the standard field names. If you are using custom fields, you’ll need to add the custom field to the row variable as shown below.
In this example, there are two custom field: org_country and org_type
var row = [
org.id,
org.name,
org.domain_names ? org.domain_names.join(', ') : '',
org.created_at,
org.updated_at,
orgAccountOwnerEmail,
org.organization_fields ? org.organization_fields.org_country : '',
org.organization_fields ? org.organization_fields.org_type : ''
];
When you’re done, hit Save & Run. You should see your organizations streaming into your Google Sheet.
Zendesk Organization Field Reference
| Name | Type | Read-only | Mandatory | Description |
|---|---|---|---|---|
| created_at | string | TRUE | FALSE | The time the organization was created |
| details | string | FALSE | FALSE | Any details about the organization, such as the address |
| domain_names | array | FALSE | FALSE | An array of domain names associated with this organization |
| external_id | string | FALSE | FALSE | A unique external id to associate organizations to an external record. The id is case-insensitive. For example, "company1" and "Company1" are considered the same |
| group_id | integer | FALSE | FALSE | New tickets from users in this organization are automatically put in this group |
| id | integer | FALSE | FALSE | Automatically assigned when the organization is created |
| name | string | FALSE | TRUE | A unique name for the organization |
| notes | string | FALSE | FALSE | Any notes you have about the organization |
| organization_fields | object | FALSE | FALSE | Custom fields for this organization. |
| shared_comments | boolean | FALSE | FALSE | End users in this organization are able to comment on each other's tickets |
| shared_tickets | boolean | FALSE | FALSE | End users in this organization are able to see each other's tickets |
| tags | array | FALSE | FALSE | The tags of the organization |
| updated_at | string | TRUE | FALSE | The time of the last update of the organization |
| url | string | TRUE | FALSE | The API url of this organization |
https://developer.zendesk.com/api-reference/ticketing/organizations/organizations/
💁🏽 Pro Tip
Zendesk has a limit of 100 rows per import BUT our script has thought of this too so go ahead and paste in as many rows as you need.
Make Updates
From within your Google Sheet edit the data you want to change. Be careful not to adjust the structure of the spreadsheet or alter the data types.
Once you’re satisfied with the changes, go back to your AppScripts tab.
Push Your Changes Back To Zendesk
Now you need to create a second script. Click the + next to Files > Script. Give it a name. I called mine syncGoogleSheetToZendesk
Paste the script below in the main window ensuring you overwrite anything already there
Adjust your script for custom fields as mentioned above. This time however you need to create a separate variable for each custom field. In my example, you will see:
var orgAccountOwnerEmail = row[headerMap['CSM']];
var orgType = row[headerMap['Type']];
The headerMap value refers to the name of the column in the Google Sheet. Adjust it accordingly
var zendeskSubdomain = 'your_subdomain';
var zendeskEmail = 'your_email';
var zendeskApiToken = 'your_api_token';
function syncGoogleSheetToZendesk() {
// Get active spreadsheet and sheet
var sheet = SpreadsheetApp.getActiveSpreadsheet().getActiveSheet();
// Get all data from the sheet
var data = sheet.getDataRange().getValues();
// Extract headers and rows
var headers = data[0];
var rows = data.slice(1);
// Map headers to their indices
var headerMap = {};
headers.forEach(function(header, index) {
headerMap[header] = index;
});
// Iterate over each row to construct API payloads
rows.forEach(function(row) {
var organizationId = row[headerMap['ID']];
var organizationName = row[headerMap['Name']];
var organizationDomainNames = row[headerMap['Domain Names']];
var orgAccountOwnerEmail = row[headerMap['CSM']];
var orgType = row[headerMap['Type']];
// Construct the organization payload
var organizationPayload = {
"organization": {
"name": organizationName,
"domain_names": organizationDomainNames ? organizationDomainNames.split(',').map(function(name) { return name.trim(); }) : [],
"organization_fields": {
"org_type": orgType
}
}
};
// Fetch the user ID for the org_account_owner_email if it's provided
if (orgAccountOwnerEmail) {
var userId = getUserIdByEmail(orgAccountOwnerEmail, zendeskEmail, zendeskApiToken);
if (userId) {
organizationPayload.organization.organization_fields.org_account_owner = userId;
}
}
// Update the organization in Zendesk
updateZendeskOrganization(organizationId, organizationPayload, zendeskEmail, zendeskApiToken);
});
Logger.log('Sync complete.');
}
function fetchZendeskData(url, zendeskEmail, zendeskApiToken) {
var options = {
'method': 'GET',
'headers': {
'Authorization': 'Basic ' + Utilities.base64Encode(zendeskEmail + ':' + zendeskApiToken)
}
};
try {
var response = UrlFetchApp.fetch(url, options);
return JSON.parse(response.getContentText());
} catch (e) {
Logger.log('Error fetching data: ' + e.message);
return null;
}
}
function getUserIdByEmail(email, zendeskEmail, zendeskApiToken) {
var url = 'https://' + zendeskSubdomain + '.zendesk.com/api/v2/search.json?query=type:user email:' + email;
var response = fetchZendeskData(url, zendeskEmail, zendeskApiToken);
if (response && response.results && response.results.length > 0) {
return response.results[0].id;
} else {
return null;
}
}
function updateZendeskOrganization(organizationId, organizationPayload, zendeskEmail, zendeskApiToken) {
var url = 'https://' + zendeskSubdomain + '.zendesk.com/api/v2/organizations/' + organizationId + '.json';
var options = {
'method': 'PUT',
'headers': {
'Authorization': 'Basic ' + Utilities.base64Encode(zendeskEmail + ':' + zendeskApiToken),
'Content-Type': 'application/json'
},
'payload': JSON.stringify(organizationPayload)
};
try {
var response = UrlFetchApp.fetch(url, options);
Logger.log('Updated organization ' + organizationId + ': ' + response.getContentText());
} catch (e) {
Logger.log('Error updating organization ' + organizationId + ': ' + e.message);
}
}
5. Replace the text 'your_subdomain' with your actual sub-domain. You can find your sub-domain in Admin Center > Brand
6. Replace the text 'your_email' with your Zendesk administrator email
7. Replace the text 'your_api_token' with the API token you created above
8. Click the Save icon
9. Click Run - you’ll be prompted to Review Permissions
10. Choose your Google account - you need to authorise that your Google account where the script and Google Sheet are stored can access your Zendesk data

This warning is because you're about to let the script execute on your Google Account.
11. You may or may not receive a warning. If you do, click Advanced

Click Go to My Zendesk User Import Script (unsafe)
12. Click Go to My Zendesk User Import Script (unsafe) - or whatever you named your script and click Allow

Google Access Permission
13. Your script will run now and you should see an Execution Log beneath the script
To Recap
Zendesk’s UI makes updating organizations en masse a bit clunky and mass updates can be very time consuming. You could purchase a 3rd party app from the marketplace but this script combined with Google Sheets can be up & running in no time.